Skip to content

Set Up Musashi Testnet Pool

This guide sets up a Musashi testnet stake pool on a Dingo node, in two sections:

  1. Dingo Node Setup.
  2. Musashi Testnet Pool Registration.

⚠️ Musashi is the Leios prototype testnet. It is reset (respun) from time to time, and each respin needs a Dingo release that ships the new Musashi configuration. Check the Dingo Release Notes for Musashi compatibility before you start.


✅ This guide assumes a typical Linux setup with systemd, on an x86-64 (amd64) or ARM64 (aarch64) machine. Please adjust commands and paths as needed.


Create a directory for your pool files, and set the variables cardano-cli uses to reach your node.

Add the variables to your .bashrc and load them:

cat <<'EOF' >> ~/.bashrc
export DINGO_HOME=~/dingo-leios-testnet
export CARDANO_NODE_NETWORK_ID=164
export CARDANO_NODE_SOCKET_PATH="$DINGO_HOME/dingo.socket"
EOF
source ~/.bashrc

💡 With CARDANO_NODE_NETWORK_ID set, cardano-cli talks to Musashi (network magic 164) without a --testnet-magic flag.

Create the working directory:

mkdir -p "$DINGO_HOME"

A block producer needs an accurate clock. Install and enable chrony:

sudo apt install -y chrony
sudo systemctl enable --now chrony

You can verify by running:

echo $DINGO_HOME $CARDANO_NODE_NETWORK_ID $CARDANO_NODE_SOCKET_PATH


Download the latest release from the Dingo releases page.

Set the architecture for the download. Dingo publishes Linux builds for amd64 and arm64:

case "$(uname -m)" in
x86_64) DINGO_ARCH=amd64 ;;
aarch64|arm64) DINGO_ARCH=arm64 ;;
*) echo "Unsupported architecture: $(uname -m)" ;;
esac
echo $DINGO_ARCH

Then download and extract the release:

cd $DINGO_HOME
wget https://github.com/blinklabs-io/dingo/releases/download/v0.88.0/dingo-v0.88.0-linux-$DINGO_ARCH.tar.gz -O - | tar -xz

Verify the binary version, then copy it to /usr/local/bin/ so it is accessible system-wide:

./dingo version
sudo cp $DINGO_HOME/dingo /usr/local/bin/

✅ You can verify the binary was copied by running which dingo


Step 3 - Download the Leios Cardano-CLI Binary

Section titled “Step 3 - Download the Leios Cardano-CLI Binary”

Musashi needs the cardano-cli from the Leios prototype release that matches the network. Find the network’s version in the MinNodeVersion field of the Musashi config.json. For example, 11.1.0.164-prototype-2026w42 matches the rc-2026w42 release on the ouroboros-leios releases page.

Make a directory and move into it:

mkdir -p "$DINGO_HOME/cli" && cd "$DINGO_HOME/cli"

The Leios release names its Linux builds x86_64 and aarch64. Set the release tag and your architecture, then download the archive and its checksum:

LEIOS_RELEASE=rc-2026w42
LEIOS_ARCH=$(uname -m)
[ "$LEIOS_ARCH" = arm64 ] && LEIOS_ARCH=aarch64
wget https://github.com/input-output-hk/ouroboros-leios/releases/download/$LEIOS_RELEASE/cardano-node-leios-$LEIOS_ARCH-linux.tar.gz
wget https://github.com/input-output-hk/ouroboros-leios/releases/download/$LEIOS_RELEASE/cardano-node-leios-$LEIOS_ARCH-linux.sha256
sha256sum -c cardano-node-leios-$LEIOS_ARCH-linux.sha256
tar -xzf cardano-node-leios-$LEIOS_ARCH-linux.tar.gz

✅ sha256sum should print cardano-node-leios-x86_64-linux.tar.gz: OK (or aarch64 on ARM64)

Move cardano-cli to /usr/local/bin, check its version, and remove the downloaded files:

sudo mv bin/cardano-cli /usr/local/bin/cardano-cli
cardano-cli --version
cd $DINGO_HOME
rm -rf cli


Dingo ships with embedded Cardano network configurations (genesis files and config.json) for Musashi, so it does not need them to run. cardano-cli needs the Shelley genesis file later in this guide, and Dingo needs a topology file.

Create the config directory and download the files:

mkdir -p "$DINGO_HOME/config" && cd "$DINGO_HOME/config"
wget https://book.play.dev.cardano.org/environments-pre/leios/shelley-genesis.json
wget https://book.play.dev.cardano.org/environments-pre/leios/topology.json
wget https://book.play.dev.cardano.org/environments-pre/leios/peer-snapshot.json

The downloaded topology connects to the Musashi bootstrap relay and uses peer-snapshot.json to find more peers, which is enough to sync.

💡 Tip: The Musashi configuration files are listed on the Musashi environment page.

Optional: add peers you know

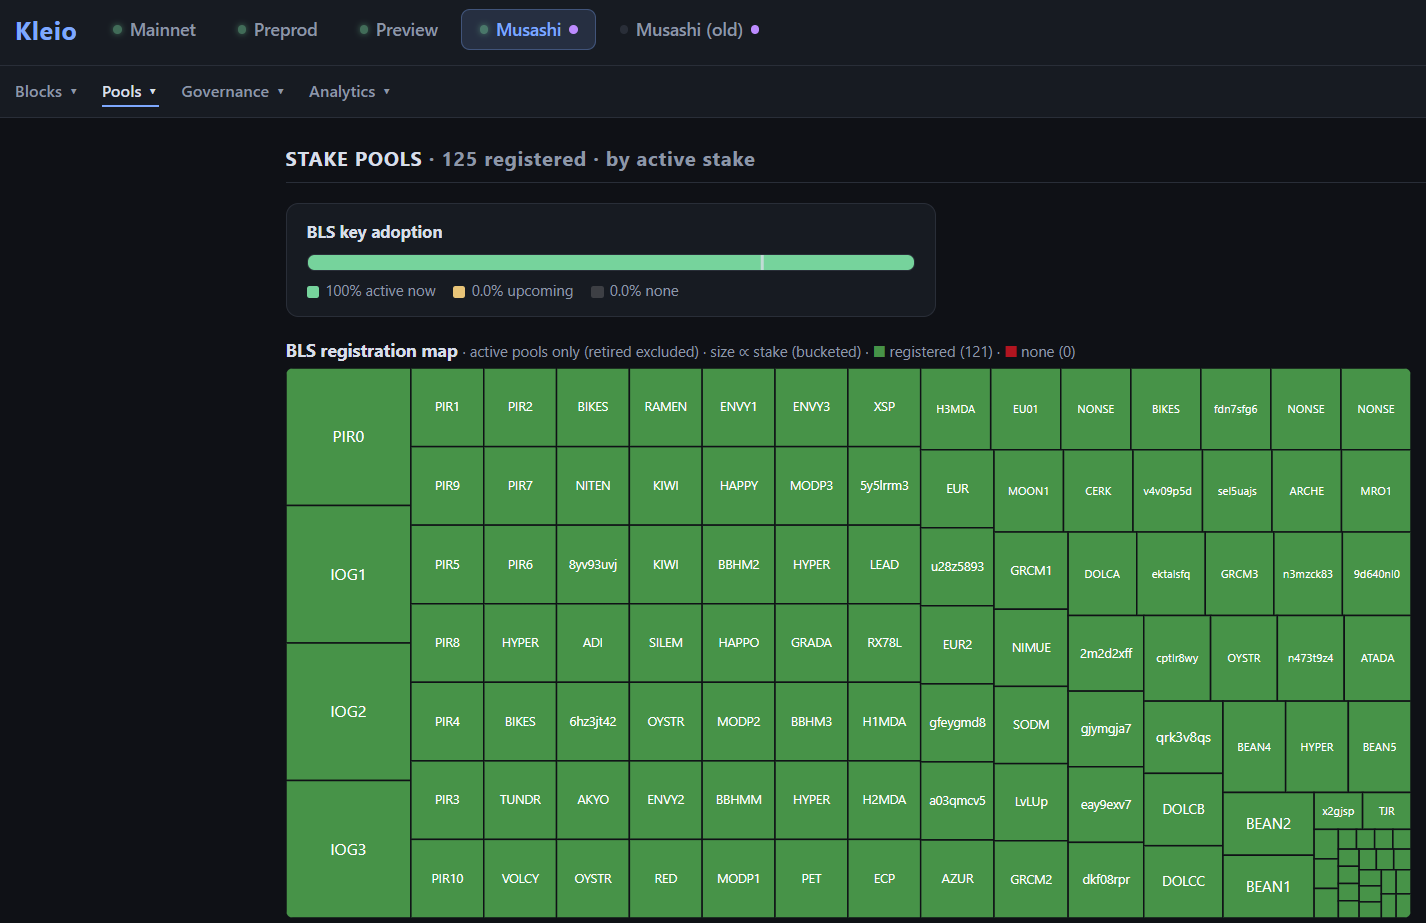
You can also add relays of other Musashi pools as local roots. Find them on the Kleioscan Musashi pools page:

Musashi pools listed on Kleioscan

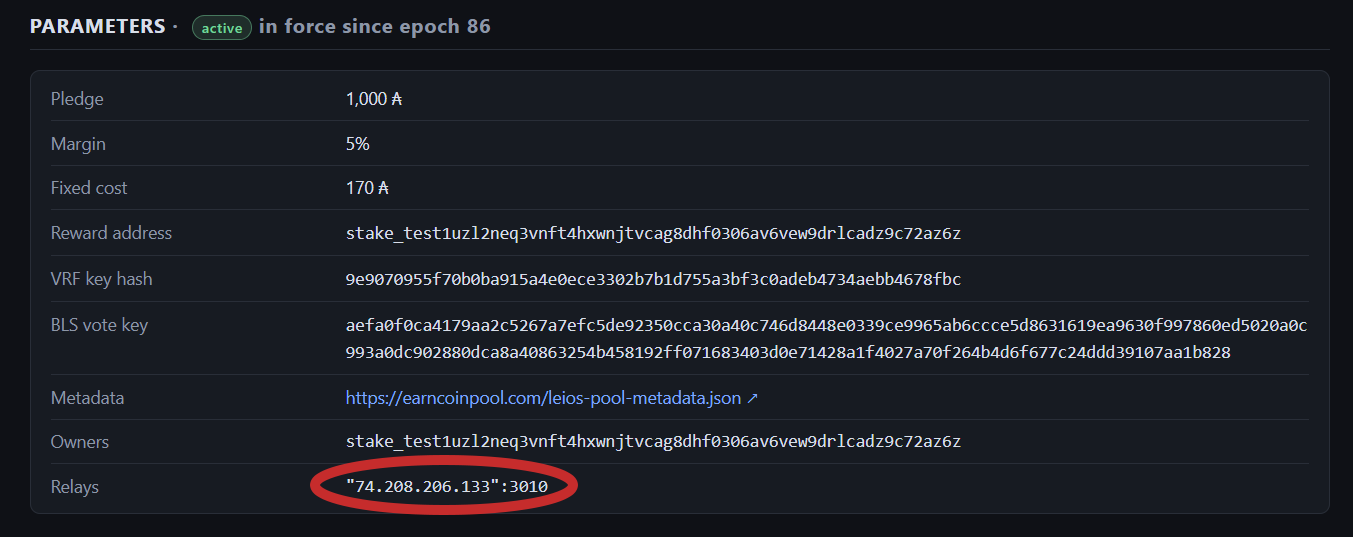
Click on some of your SPO friends and copy 📝 their public IPs and ports:

A Musashi pool's relays on Kleioscan

Then add them to the localRoots section of topology.json:

nano $DINGO_HOME/config/topology.json

Example localRoots section with 3 pools:

"localRoots": [
{
"accessPoints": [
{ "address": "RELAY_1_ADDRESS", "port": RELAY_1_PORT },
{ "address": "RELAY_2_ADDRESS", "port": RELAY_2_PORT },
{ "address": "RELAY_3_ADDRESS", "port": RELAY_3_PORT }
],
"advertise": false,
"trustable": false,
"valency": 3
}
],

Replace the RELAY_* placeholders with the addresses and ports you copied from Kleioscan, and set valency to the number of relays you added. Leave the rest of the file as downloaded; useLedgerAfterSlot changes when the network is respun.


Step 5 - Create dingo.yaml Configuration File

Section titled “Step 5 - Create dingo.yaml Configuration File”

Create the configuration directory and the database directory:

sudo mkdir -p /etc/dingo
mkdir -p $DINGO_HOME/.dingo

Create the dingo.yaml file:

The $DINGO_HOME variable will automatically expand to your home directory path.

sudo bash -c "cat <<EOF > /etc/dingo/dingo.yaml
# Global data directory for both blob and metadata storage plugins.
# Can be overridden with CARDANO_DATABASE_PATH or --data-dir.
databasePath: \"$DINGO_HOME/.dingo\"
# Network
network: \"musashi\"
relayPort: 3010
socketPath: \"$DINGO_HOME/dingo.socket\"
# Path to the topology configuration file for Cardano node
topology: \"$DINGO_HOME/config/topology.json\"
# Mempool: 25 MiB, the Leios size. Dingo v0.88.0 keeps the 1 MiB
# default on Musashi, which fills and expires transactions.
plugins:
mempool:
config:
capacity: 26214400
EOF"

💡 The plugins.mempool block raises the mempool from Dingo’s 1 MiB default to 25 MiB, the size Dingo uses for Leios. At 1 MiB the mempool fills on Musashi and transactions expire before they are included.

You can view and verify the dingo.yaml file by running:

cat /etc/dingo/dingo.yaml

💡 Tip: Make sure port 3010 is open.

sudo ufw allow 3010/tcp


Create the systemd service file. Replace YOUR_USER with your Linux username (echo $USER):

cat <<ENDFILE | sudo tee /etc/systemd/system/dingo.service > /dev/null
[Unit]
Description=Dingo Node
After=network-online.target
[Service]
Type=simple
Restart=on-failure
RestartSec=10
User=YOUR_USER
ExecStart=/usr/local/bin/dingo serve --config /etc/dingo/dingo.yaml
SyslogIdentifier=dingo
TimeoutStopSec=5
[Install]
WantedBy=multi-user.target
ENDFILE

You can view and verify the dingo.service file by running:

cat /etc/systemd/system/dingo.service


Enable the service to start on boot and start it now:

sudo systemctl daemon-reload
sudo systemctl enable dingo.service
sudo systemctl start dingo.service


Verify the service is running:

sudo systemctl status dingo.service

To follow the logs in real time:

sudo journalctl -u dingo -f

To see recent logs if there is an error:

sudo journalctl -u dingo -n 50 --no-pager

Check the sync progress. The node is synced when syncProgress reads 100.00:

cardano-cli query tip


Congratulations! You can now move to the Musashi Testnet Pool Registration section

Section titled “Congratulations! You can now move to the Musashi Testnet Pool Registration section”


Section 2 - Musashi Testnet Pool Registration

Section titled “Section 2 - Musashi Testnet Pool Registration”

Make sure the node is fully synced before proceeding. cardano-cli query tip should show "syncProgress": "100.00".

The commands in this section use the dijkstra era. Confirm the era with the era field of cardano-cli query tip.


Create a keys folder for your pool keys and certificate files, and move into it. Back this folder up: these keys control your pool.

mkdir -p "$DINGO_HOME/keys" && cd "$DINGO_HOME/keys"


Create payment keys:

cardano-cli dijkstra address key-gen \
--verification-key-file payment.vkey \
--signing-key-file payment.skey

Create stake keys:

cardano-cli dijkstra stake-address key-gen \
--verification-key-file stake.vkey \
--signing-key-file stake.skey


Step 3 - Create and Fund Your Payment Address

Section titled “Step 3 - Create and Fund Your Payment Address”

Create the payment address and save it to payment.addr:

cardano-cli dijkstra address build \
--payment-verification-key-file payment.vkey \
--stake-verification-key-file stake.vkey \
--out-file payment.addr

Show your payment address and copy it:

cat payment.addr; echo

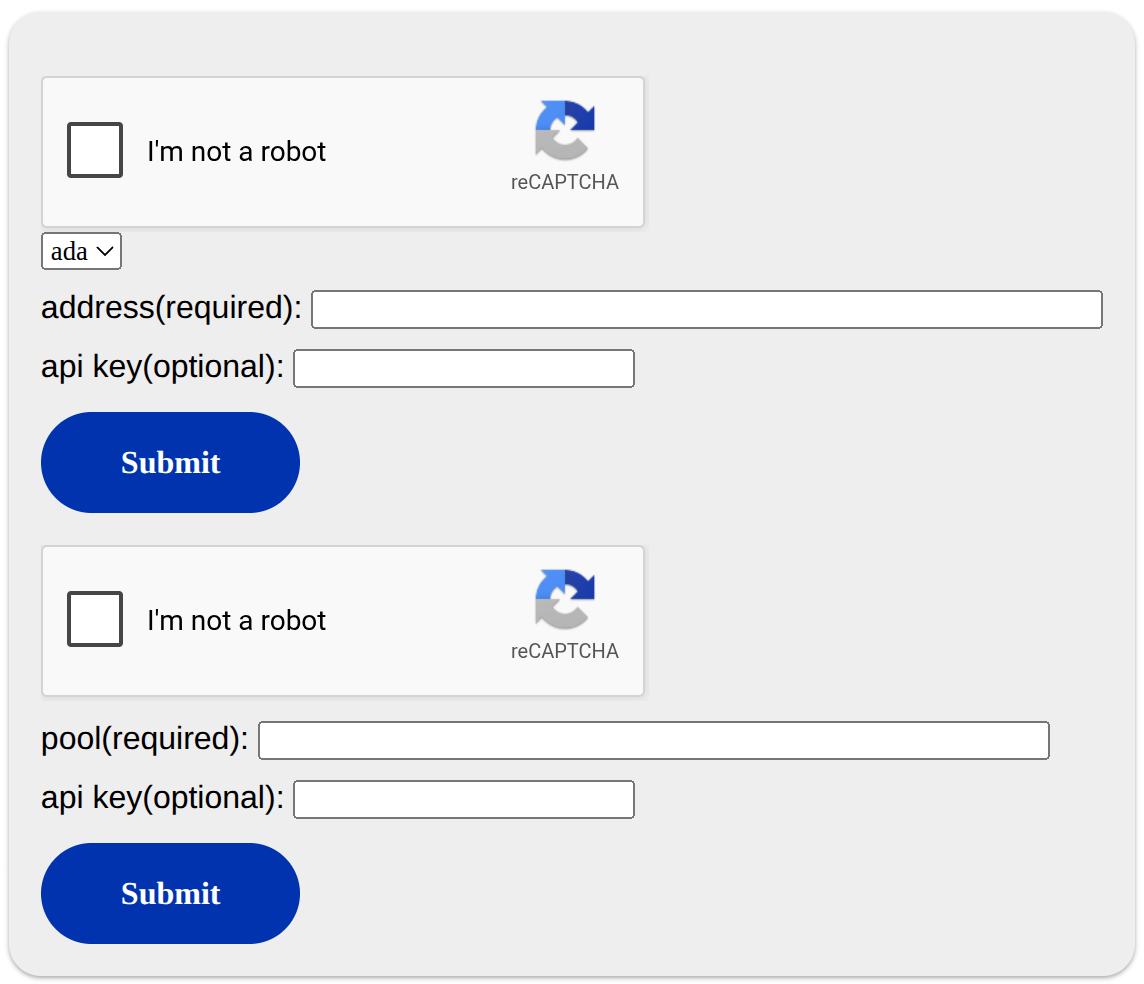
Go to the Musashi faucet, paste your address into the first form (address), tick its reCAPTCHA box, and submit. The faucet sends 10,000 test ada, which covers the 500 ada pool deposit, the 2 ada stake address deposit, the pledge and the fees.

Musashi faucet with the address form on top and the pool delegation form below

Confirm the test ada arrived. You should see one UTxO entry:

cardano-cli dijkstra query utxo --address "$(cat payment.addr)"


Create the cold keys, KES keys and VRF keys.

Cold keys (your pool’s identity)

cardano-cli dijkstra node key-gen \
--cold-verification-key-file cold.vkey \
--cold-signing-key-file cold.skey \
--operational-certificate-issue-counter-file opcert.counter

⚠️ This testnet guide creates the cold keys on the node for simplicity. On mainnet, create and keep the cold keys on an offline machine.

KES keys (hot keys, rotated periodically)

cardano-cli dijkstra node key-gen-KES \
--verification-key-file kes.vkey \
--signing-key-file kes.skey

VRF keys (used to win block-production slots)

cardano-cli dijkstra node key-gen-VRF \
--verification-key-file vrf.vkey \
--signing-key-file vrf.skey


BLS keys are the keys pools use to vote on and certify Leios endorser blocks. The pool registration certificate in Step 9 cannot be built without one.

cardano-cli dijkstra node key-gen-BLS \
--verification-key-file bls.vkey \
--signing-key-file bls.skey

✅ jq -r .type bls.vkey should print BlsVerificationKey_bls12-381-BLS-Signature-Minimal-Signature-Size


Find the current KES period:

slotsPerKESPeriod=$(jq -r '.slotsPerKESPeriod' "$DINGO_HOME/config/shelley-genesis.json")
slotNo=$(cardano-cli query tip | jq -r '.slot')
kesPeriod=$(( slotNo / slotsPerKESPeriod ))
echo $kesPeriod

Create the operational certificate node.cert:

cardano-cli dijkstra node issue-op-cert \
--kes-verification-key-file kes.vkey \
--cold-signing-key-file cold.skey \
--operational-certificate-issue-counter-file opcert.counter \
--kes-period "$kesPeriod" \
--out-file node.cert


Update the values below with your pool’s information.

📝 ticker must be between 3-5 characters in length 📝 description cannot exceed 255 characters in length.

cat > meta.json << EOF
{
"name": "MyPoolName",
"description": "My pool description",
"ticker": "ABC",
"homepage": "https://pool-Website.com"
}
EOF

Calculate the hash of your metadata file. The hash is saved to poolMetaDataHash.txt:

cardano-cli dijkstra stake-pool metadata-hash \
--pool-metadata-file meta.json \
--out-file poolMetaDataHash.txt


The metadata URL in your pool registration can be at most 128 characters long. If you already host metadata on your own website, set METADATA_URL to that URL below and skip the GitHub steps. Otherwise, GitHub Pages hosts it for free:

  1. Sign in to GitHub and create a new public repository named pool.

  2. In the repository, select Add file → Upload files, upload your meta.json, and commit it to the main branch.

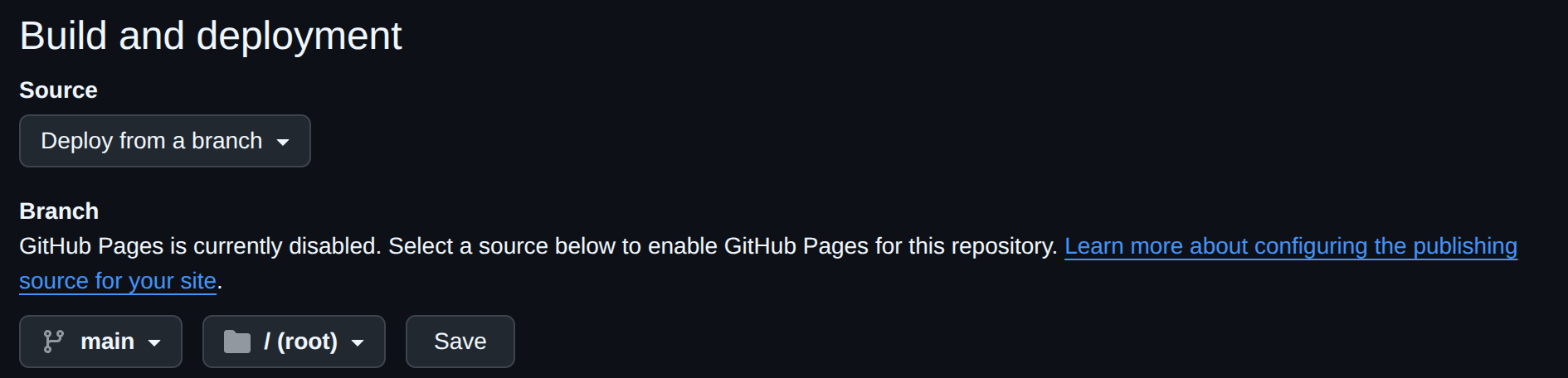
  3. Open Settings → Pages. Under Build and deployment, set Source to Deploy from a branch, choose the main branch and the / (root) folder, and select Save.

    GitHub Pages build and deployment settings with Deploy from a branch, main and / (root) selected

  4. After a minute or two, your metadata is served at https://YOUR_GITHUB_USERNAME.github.io/pool/meta.json.

Set the URL and check that it works and is no longer than 128 characters:

METADATA_URL=https://YOUR_GITHUB_USERNAME.github.io/pool/meta.json
curl -s -L "$METADATA_URL"
echo -n "$METADATA_URL" | wc -c

Check that the hosted file has the same hash as your local file. The two commands should print the same hash:

cardano-cli dijkstra stake-pool metadata-hash --pool-metadata-file <(curl -s -L "$METADATA_URL")
cat poolMetaDataHash.txt; echo

⚠️ Upload the file exactly as cardano-cli hashed it. Editing it on GitHub afterwards changes the hash, so it no longer matches the hash in your registration and wallets and explorers ignore your metadata.


Build both the stake address and pool certificates, then submit them in a single transaction.

Stake address registration certificate:

cardano-cli dijkstra stake-address registration-certificate \
--stake-verification-key-file stake.vkey \
--key-reg-deposit-amt "$(cardano-cli dijkstra query protocol-parameters | jq .stakeAddressDeposit)" \
--out-file stake-reg.cert

Pool registration certificate:

Set RELAY_IP to your node’s public IPv4 address, the one other nodes use to reach it. The metadata URL comes from the METADATA_URL you set in Step 8.

RELAY_IP=YOUR_PUBLIC_IP

Then build the certificate. The values below set a pledge of 1,000 test ada, a fixed cost of 170 test ada and a 5% margin.

cardano-cli dijkstra stake-pool registration-certificate \
--cold-verification-key-file cold.vkey \
--vrf-verification-key-file vrf.vkey \
--bls-signing-key-file bls.skey \
--pool-pledge 1000000000 \
--pool-cost 170000000 \
--pool-margin 0.05 \
--pool-reward-account-verification-key-file stake.vkey \
--pool-owner-stake-verification-key-file stake.vkey \
--pool-relay-ipv4 "$RELAY_IP" \
--pool-relay-port 3010 \
--metadata-url "$METADATA_URL" \
--metadata-hash $(cat poolMetaDataHash.txt) \
--out-file pool-reg.cert

Build, sign and submit the transaction:

Get the UTxO for --tx-in. Right after the faucet payment, there is a single UTxO at your address:

TXIN=$(cardano-cli dijkstra query utxo --address "$(cat payment.addr)" | jq -r 'keys[0]')

Build the transaction:

cardano-cli dijkstra transaction build \
--tx-in "$TXIN" \
--change-address "$(cat payment.addr)" \
--certificate-file stake-reg.cert \
--certificate-file pool-reg.cert \
--out-file pool-reg-tx.raw

Sign the transaction:

cardano-cli dijkstra transaction sign \
--tx-body-file pool-reg-tx.raw \
--signing-key-file payment.skey \
--signing-key-file stake.skey \
--signing-key-file cold.skey \
--out-file pool-reg-tx.signed

Submit the transaction:

cardano-cli dijkstra transaction submit \
--tx-file pool-reg-tx.signed


Your pledge only counts once your own stake is delegated to your pool. Build a delegation certificate and submit it in its own transaction.

Create the delegation certificate:

cardano-cli dijkstra stake-address stake-delegation-certificate \
--stake-verification-key-file stake.vkey \
--cold-verification-key-file cold.vkey \
--out-file delegation.cert

Wait for the registration transaction to reach a block. Its input ($TXIN from Step 9) leaves your address once it does:

while cardano-cli dijkstra query utxo --address "$(cat payment.addr)" | jq -e --arg txin "$TXIN" 'has($txin)' > /dev/null; do sleep 5; done

Then get the UTxO for --tx-in:

TXIN=$(cardano-cli dijkstra query utxo --address "$(cat payment.addr)" | jq -r 'keys[0]')

Build the transaction:

cardano-cli dijkstra transaction build \
--tx-in "$TXIN" \
--change-address "$(cat payment.addr)" \
--certificate-file delegation.cert \
--out-file delegation-tx.raw

Sign the transaction:

cardano-cli dijkstra transaction sign \
--tx-body-file delegation-tx.raw \
--signing-key-file payment.skey \
--signing-key-file stake.skey \
--out-file delegation-tx.signed

Submit the transaction:

cardano-cli dijkstra transaction submit \
--tx-file delegation-tx.signed


Step 11 - Request Delegation from the Faucet

Section titled “Step 11 - Request Delegation from the Faucet”

A 1,000 ada pledge is too small for your pool to be selected to forge blocks. The faucet can delegate about 1,000,000 test ada to your pool.

Get your pool ID in bech32 format (pool1…):

cardano-cli dijkstra stake-pool id --output-bech32 --cold-verification-key-file cold.vkey

Go to the Musashi faucet, paste your pool ID into the second form (pool, the lower form in the screenshot in Step 3), tick its reCAPTCHA box, and submit.


Capture your pool ID and stake address:

POOL_ID=$(cardano-cli dijkstra stake-pool id --cold-verification-key-file cold.vkey --output-format hex)
STAKE_ADDR=$(cardano-cli dijkstra stake-address build --stake-verification-key-file stake.vkey)
echo "pool id: $POOL_ID"
echo "stake address: $STAKE_ADDR"

Check that the pool is registered on-chain. This prints your pool’s parameters (pledge, cost, margin, VRF):

cardano-cli dijkstra query pool-state --stake-pool-id "$POOL_ID"

Check that the delegation took effect. stakeDelegation should show your pool ID:

cardano-cli dijkstra query stake-address-info --address "$STAKE_ADDR"

Check that your BLS key is registered:

cardano-cli dijkstra query pool-state --stake-pool-id "$POOL_ID" | jq '.[].blsKey'
  • The public key under blsKey should match your key. Compare it with your bls.vkey without its 4-character 5860 CBOR prefix:
    jq -r .cborHex bls.vkey | cut -c5-
  • bksRegisteredIn is the epoch your registration takes effect in. cardano-cli reports this epoch because the node does not expose the epoch the key was registered in. Note it: the key expires a fixed number of epochs after it (see Step 15).

💡 See the Musashi Testnet Rewards Program page for details. Pools in the program report telemetry with Metsuke, an agent built for the Haskell cardano-node that reads the node’s Prometheus endpoint and its trace lines.


Step 13 - Configure Dingo as a Block Producer

Section titled “Step 13 - Configure Dingo as a Block Producer”

Stop the Dingo node:

sudo systemctl stop dingo

Restrict the signing keys so only your user can read them. Dingo refuses to load a BLS signing key that group or other users can read:

chmod 600 $DINGO_HOME/keys/*.skey

Replace your dingo.yaml with the block producer configuration, which adds your KES key, VRF key, operational certificate and BLS key to the settings from Section 1:

sudo bash -c "cat <<EOF > /etc/dingo/dingo.yaml
# Global data directory for both blob and metadata storage plugins.
# Can be overridden with CARDANO_DATABASE_PATH or --data-dir.
databasePath: \"$DINGO_HOME/.dingo\"
# Network
network: \"musashi\"
relayPort: 3010
socketPath: \"$DINGO_HOME/dingo.socket\"
# Path to the topology configuration file for Cardano node
topology: \"$DINGO_HOME/config/topology.json\"
# Block producer
blockProducer: true
shelleyVrfKey: \"$DINGO_HOME/keys/vrf.skey\"
shelleyKesKey: \"$DINGO_HOME/keys/kes.skey\"
shelleyOperationalCertificate: \"$DINGO_HOME/keys/node.cert\"
# Leios voting: the BLS key registered with your pool in Step 9
leiosVoteSigningKeyFile: \"$DINGO_HOME/keys/bls.skey\"
# Mempool: 25 MiB, the Leios size. Dingo v0.88.0 keeps the 1 MiB
# default on Musashi, which fills and expires transactions.
plugins:
mempool:
config:
capacity: 26214400
EOF"

💡 Without leiosVoteSigningKeyFile, the pool still forges blocks but does not vote on Leios endorser blocks.

You can view and verify the dingo.yaml file by running:

cat /etc/dingo/dingo.yaml


Start the Dingo node:

sudo systemctl start dingo

Verify that Dingo is running:

sudo systemctl status dingo

To follow the logs in real time:

sudo journalctl -u dingo -f

To see recent logs if there is an error:

sudo journalctl -u dingo -n 50 --no-pager

💡 Your pool starts forging about two epochs after registration, once the stake snapshot that includes your stake takes effect.


BLS keys expire. A key is valid while the current epoch is less than bksRegisteredIn plus the network’s maximum key age, which the testnet announces. After that, your pool keeps its committee seat but cannot vote.

Rotating the key is a re-registration with a new BLS key and all other values unchanged. Rotate well before expiry: the new key takes effect at an epoch boundary.

Create the new key, keeping the old one until the rotation is on-chain:

cd $DINGO_HOME/keys
cardano-cli dijkstra node key-gen-BLS \
--verification-key-file bls-new.vkey \
--signing-key-file bls-new.skey

Build the new registration certificate with the same values as in Step 9. In a new shell, set RELAY_IP and METADATA_URL again first:

RELAY_IP=YOUR_PUBLIC_IP
METADATA_URL=https://YOUR_GITHUB_USERNAME.github.io/pool/meta.json
cardano-cli dijkstra stake-pool registration-certificate \
--cold-verification-key-file cold.vkey \
--vrf-verification-key-file vrf.vkey \
--bls-signing-key-file bls-new.skey \
--pool-pledge 1000000000 \
--pool-cost 170000000 \
--pool-margin 0.05 \
--pool-reward-account-verification-key-file stake.vkey \
--pool-owner-stake-verification-key-file stake.vkey \
--pool-relay-ipv4 "$RELAY_IP" \
--pool-relay-port 3010 \
--metadata-url "$METADATA_URL" \
--metadata-hash $(cat poolMetaDataHash.txt) \
--out-file pool-rotate.cert

Submit it on its own (no stake address certificate this time):

TXIN=$(cardano-cli dijkstra query utxo --address "$(cat payment.addr)" | jq -r 'keys[0]')
cardano-cli dijkstra transaction build \
--tx-in "$TXIN" \
--change-address "$(cat payment.addr)" \
--certificate-file pool-rotate.cert \
--out-file pool-rotate.raw
cardano-cli dijkstra transaction sign \
--tx-body-file pool-rotate.raw \
--signing-key-file payment.skey \
--signing-key-file cold.skey \
--out-file pool-rotate.signed
cardano-cli dijkstra transaction submit --tx-file pool-rotate.signed

Watch for the new registration epoch:

POOL_ID=$(cardano-cli dijkstra stake-pool id --cold-verification-key-file cold.vkey --output-format hex)
cardano-cli dijkstra query pool-state --stake-pool-id "$POOL_ID" | jq '.[].blsKey.bksRegisteredIn'

Switch Dingo to the new key only after bksRegisteredIn shows the new epoch and the following epoch boundary has passed. Then set leiosVoteSigningKeyFile in /etc/dingo/dingo.yaml to the full path of the new key (print it with echo $DINGO_HOME/keys/bls-new.skey), make it readable only by your user (chmod 600), and restart Dingo with sudo systemctl restart dingo.


Dingo serves Prometheus metrics on 127.0.0.1:12798. To chart them, follow the Grafana dashboards guide and pick musashi in the dashboards’ network selector.

To check from the command line whether your pool is voting:

curl -s 127.0.0.1:12798/metrics | grep -E '^dingo_metrics_leios_(committee_size|votes_not_emitted)'

dingo_metrics_leios_votes_not_emitted_total counts the endorser blocks your node did not vote on, by reason. Until your BLS key is in the on-chain stake snapshot, the count rises under reason="no_key".


Congratulations! You have a Leios Dingo Node running on the Musashi Testnet.

Section titled “Congratulations! You have a Leios Dingo Node running on the Musashi Testnet.”


Credit to original guides and additional resources here: Getting started and Register a stake pool